How to Install Acoustic Panels on Your Walls: Step-by-Step Guide for Noise Reduction and Style
Are you tired of echoes and unwanted noise in your living space? Installing acoustic panels on your walls can be a game-changer, offering both sound absorption and stylish aesthetics. This step-by-step guide will walk you through the process of selecting, positioning, and mounting acoustic panels to achieve optimal noise reduction and enhance your room’s ambiance. Whether you’re a home studio enthusiast, a remote worker seeking a quieter environment, or simply someone who values peace and tranquility, this article will equip you with the knowledge and techniques needed to transform your space. Get ready to embark on a journey that will not only improve your room’s acoustics but also elevate its visual appeal.
Benefits of Acoustic Panels for Reducing Noise and Adding Style
Effective Sound Absorption
Acoustic panels are powerful tools for managing sound in any space. These specially designed panels absorb sound waves, significantly reducing echoes and unwanted background noise. By dampening reverberations, they create a more comfortable auditory environment, whether in a home office, recording studio, or open-plan living area.
Ambient Noise Reduction
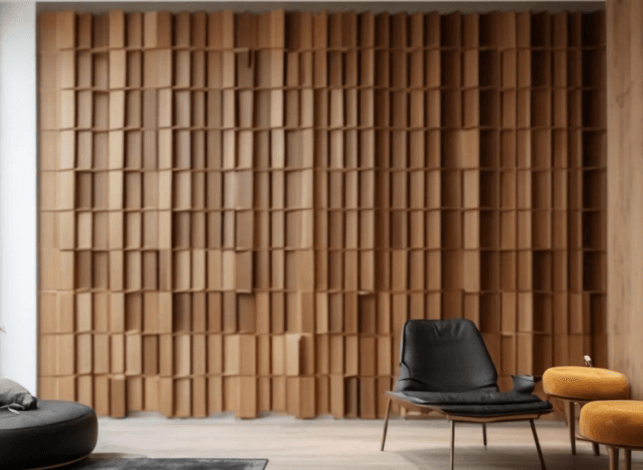
Wooden acoustic panels, in particular, excel at lessening ambient noise. They effectively absorb a wide range of frequencies, from low rumbles to high-pitched sounds. This versatility makes them ideal for tackling various noise issues, from traffic sounds to conversations in adjacent rooms. By minimizing these distractions, acoustic panels can dramatically improve focus and productivity in work environments.


Aesthetic Enhancement
Beyond their functional benefits, acoustic panels offer significant aesthetic advantages. Available in a variety of colors, textures, and patterns, these panels can be seamlessly integrated into your interior design scheme. From sleek, modern designs to rustic wooden finishes, acoustic panels can enhance the visual appeal of any space while simultaneously improving its acoustic properties. This dual functionality makes them an attractive option for those seeking both style and substance in their interior design choices.
Step-by-Step Guide to Installing Acoustic Panels on Walls
Preparation and Planning
Before diving into installation, proper preparation is key. Start by measuring your wall to determine the number of acoustic panels needed. Use a level to ensure straight placement and mark the wall for panel positioning. Sand the surface if necessary to create a smooth base for adhesion.
Installation Methods
There are several ways to mount acoustic panels, each with its own benefits:
- Impaling Clips: Install clips on the wall, apply construction adhesive to the panel back, then mount panels onto the clips.
- Permanent Adhesive: For a long-lasting solution, apply silicone adhesive directly to the wall and press panels firmly into place.
- Command Strips: An easy, damage-free option ideal for renters or temporary setups.
- Z-Clips: Provide a secure, flush mount that allows for easy panel removal when needed.
- Ceiling Cloud Hanging: Suspend panels from the ceiling for a unique aesthetic and improved sound diffusion.
- Standoff Mounting: Create a floating effect by using metal standoffs to position panels slightly away from the wall.
Choose the method that best suits your needs and follow manufacturer guidelines for optimal results.
Acoustic Panel Placement Tips and Tricks for Optimal Noise Reduction
- Strategic Height Placement: When installing acoustic panels, mount them at ear or speaker height to effectively capture early sound reflections. This strategic placement ensures that the panels intercept sound waves at the most crucial point, maximizing their noise reduction capabilities. Typically, aim to keep panels within 12-14 feet above the finished floor for optimal performance.
- First Point of Contact: Identify the first point on the wall where sound waves hit after leaving the source. This is often where echoes and reverberations begin to form. Place acoustic panels at these key locations to absorb sound energy before it can bounce and create unwanted noise. Use a simple sound test or consult with an acoustics professional to pinpoint these critical areas in your space.
- Balance Aesthetics and Function: While focusing on optimal noise reduction, don’t forget about the visual appeal of your space. Arrange panels in symmetrical patterns or create artistic configurations that complement your room’s decor. Remember, effective acoustic treatment doesn’t have to sacrifice style – with careful planning, you can achieve both superior sound quality and an aesthetically pleasing environment.
Conclusion
By following this step-by-step guide, you can successfully install acoustic panels on your walls, enhancing both the sound quality and aesthetic appeal of your space. Remember to carefully plan your layout, gather the necessary tools and materials, and take your time with each step of the installation process. The benefits of acoustic panels extend beyond noise reduction, offering improved acoustics for music and conversations, as well as adding a stylish element to your decor. With patience and attention to detail, you can transform your room into a more comfortable and aurally pleasing environment. Embrace the dual advantages of form and function that acoustic panels provide, and enjoy the newfound tranquility and style in your living or working space.